Visualizing "Trust" with AI Transparency Labels and Fact-Checking
The conditions for being read in an era overflowing with AI-written articles
機械翻訳 / Machine-translated
2026年8月4日・10分で読める

The conditions for being read in an era overflowing with AI-written articles
機械翻訳 / Machine-translated
Now that AI-written articles are circulating in massive quantities, readers have developed a persistent suspicion: "Did an actual person verify this?" MiraiPage has two features designed to answer that question head-on: AI Transparency Labels and AI Fact-Check.
When writing an article, you can choose from three levels indicating how much you used AI, and display that information publicly.
| Label | Meaning |
|---|---|
| ✍️ Written by Human | Written by a person without using AI for text generation. Using AI for research is included. |
| 🤝 AI Used as Assistant | AI was partially used for structure, proofreading, research, or rephrasing, but a person was primarily responsible for writing. |
| 🤖 Primarily AI-Generated | Most of the body was generated by AI, with a person editing and fact-checking before publication. |
The label you choose appears on the article and is also included in the image when shared on social media.
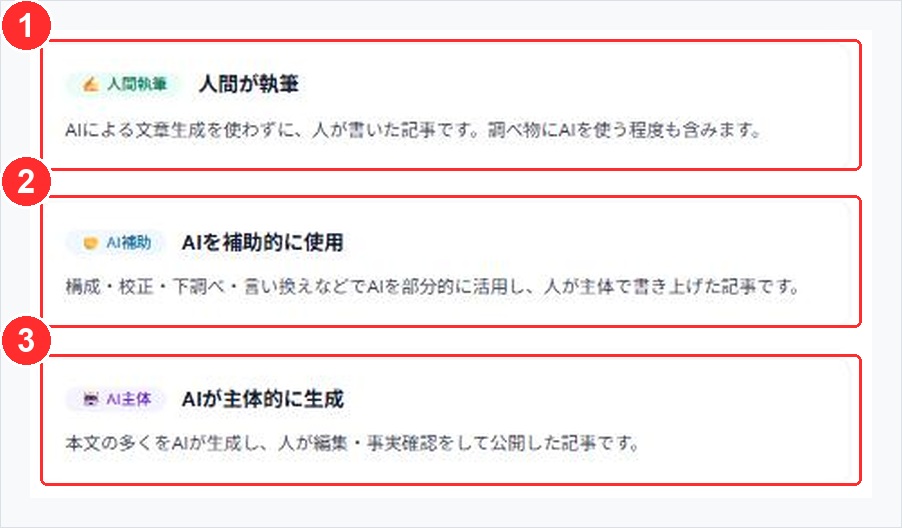
The AI Transparency Policy. Three levels: ① Written by Human ② AI Used as Assistant ③ Primarily AI-Generated
You might think that displaying "Primarily AI-Generated" would stop people from reading your article. In practice, the opposite is true.
What readers dislike is not "being written by AI" — it's "being written by AI while pretending it was written by a human."
If you honestly display "Primarily AI-Generated" and the content is solid, readers will read it just fine. In fact, trust builds up: "This person applies labels honestly."
Labels are optional. If you don't set one, nothing is displayed. However, please avoid one thing at all costs: choosing "Written by Human" when you actually used AI. The cost of getting caught even once is far too high.
This is a feature that goes one step further. It extracts factual claims from your article and searches the web to verify them.
The third requirement is strict. Articles that exceed this limit are rejected as "ineligible" before the check runs. Previously, the excess portion was simply cut off before running the check — but this was discontinued because the badge would then be applied to content that hadn't actually been verified. The policy is: if the entire article cannot be verified, no badge is issued.
A passing badge is only awarded when at least one claim is supported AND zero claims are contradicted.
There is one important design choice here. Articles where every claim came back as "could not be confirmed" do not receive a badge.
The reason is simple. An article filled with fabricated statistics will have no sources in the world that contradict those statistics — so it doesn't fall into "contradicted," it falls into "could not be confirmed." If "could not be confirmed" were treated as a pass, the result would be that the more an article is packed with fabrications, the easier it becomes to earn a badge — a complete inversion of intent.
That is why articles where not a single claim could be supported do not receive a passing result.
It is by design that essays and poetry do not receive a badge. There is simply nothing to verify in the first place.
This status is protected at the database level — it is not possible to overwrite the result to "passed" via an API or any external means. Only articles that have actually passed verification receive the badge.
Fact-checking is unnecessary for everyday essays. Conversely, it works well for articles handling statistics or research findings. If your article includes even one number, it's worth running.
Going forward, the volume of articles will only continue to grow. Readers cannot read everything, so they will develop criteria for filtering things out before they even start reading.
What will matter in that moment is not the quality of the writing, but the judgment: "This writer doesn't lie." Labels and badges are tools for making that case visible on the outside of the article itself.
Neither takes more than a few seconds to set up. If you spent hours writing an article, there's no reason not to.
This concludes the first season of the "MiraiPage Tips & Tricks" series. The basics of how to use MiraiPage are covered in the separate series, "How to Use MiraiPage."
If you have questions or requests for topics you'd like explained, write them in the comments on this article. They'll become material for the next season.